macOS で PNG 画像を圧縮処理するコマンド「pngquant」を使う
概要
- ちょっとした画像の圧縮は TinyPNG を使わせてもらってるが、一気に50枚ほど処理したいシーンが出てきた
- macOS 上のコマンド操作で対応できる pngquant を試してみる。
導入するもの
- pngquant — lossy PNG compressor
参考エントリー
- PNG圧縮ツールpngquantの使い方を解説 #初心者 – Qiita
作業ログ
インストール
brew install pngquant使い方を見る
> pngquant -h
pngquant, 3.0.3 (Rust), by Kornel Lesinski, Greg Roelofs.

usage:  pngquant [options] [ncolors] -- pngfile [pngfile ...]
        pngquant [options] [ncolors] - >stdout <stdin

options:
  --force           overwrite existing output files (synonym: -f)
  --skip-if-larger  only save converted files if they're smaller than original
  --output file     destination file path to use instead of --ext (synonym: -o)
  --ext new.png     set custom suffix/extension for output filenames
  --quality min-max don't save below min, use fewer colors below max (0-100)
  --speed N         speed/quality trade-off. 1=slow, 4=default, 11=fast & rough
  --nofs            disable Floyd-Steinberg dithering
  --posterize N     output lower-precision color (e.g. for ARGB4444 output)
  --strip           remove optional metadata (default on Mac)
  --verbose         print status messages (synonym: -v)

Quantizes one or more 32-bit RGBA PNGs to 8-bit (or smaller) RGBA-palette.
The output filename is the same as the input name except that
it ends in "-fs8.png", "-or8.png" or your custom extension (unless the
input is stdin, in which case the quantized image will go to stdout).
If you pass the special output path "-" and a single input file, that file
will be processed and the quantized image will go to stdout.
The default behavior if the output file exists is to skip the conversion;
use --force to overwrite. See man page for full list of options.
現在のディレクトリ内のPNG画像を一気に圧縮
実行コマンド
pngquant --ext .png *.png --force--ext .png:拡張子を.pngで出力*.png:対象ファイルを指定--force:同名ファイルが存在する場合に上書きする
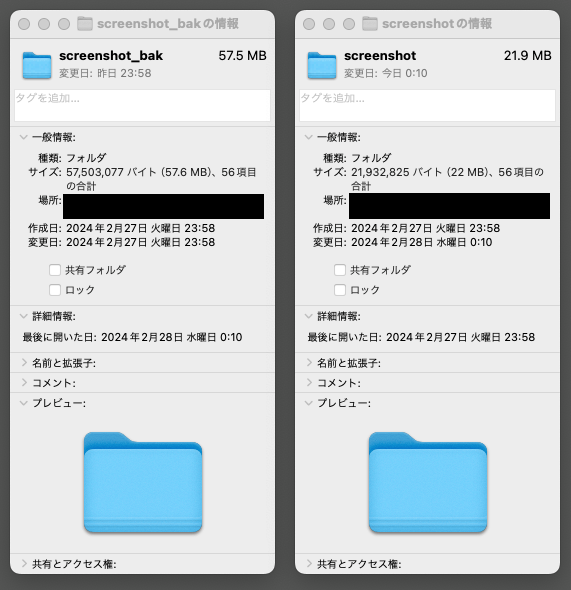
結果
56枚のスクリーンショット画像に対して適用。おおむね半分以下の容量になった。
エイリアスに登録する
とりあえず「カレントディレクトリ内のすべてを圧縮」という操作はサクッとできるよう、zsh のエリアスを追加しておく
.zshrc の編集画面に入る
vi ~/.zshrc以下を入力して保存
alias tinypng="pngquant --ext .png *.png --force".zshrc を再読み込み
source ~/.zshrcPNG画像が配置してあるディレクトリで以下を実行し、動作チェック
tinypng